We got into groups for the Finchingfield Guildhall project. The group consists of Hong, Steve, Jack and Me.
We have created a blog and next we need to meet up to discus whether we will be creating an animation to show the history of the Guildhall or to show how the refurbished building will look and show how it will be used.
A blog for the group project can be found here: http://finchingfielddesign.blogspot.com/
Saturday, 8 October 2011
Extending the head
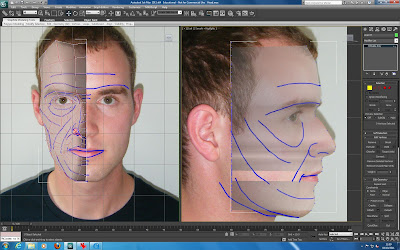
The next step is to create the back of the head and neck. The back of the head will be modelled separately and joined to the face, the same method will also be used for when modelling the ear. First I started by drawing some topology guidelines for the back of the head and then loaded these into 3DS Max.
With the new reference plates loaded I added a sphere into the scene, rotated it so the poles were facing the side (where the ears will be) and scaled it to the shape of my head. I adjusted the amount of segments in the sphere so that there were the same amount as the topology on the head.

I deleted polygons from the sphere to start to shape head. I deleted the inner polgons on the side of the head as well as the ones covering the face and half of sphere as a symmetry modifier will be applied later.

I turned on snap to vertex and moved the vertices at the front of the head so that they lined up with the ones for the face with the use of soft selection.
Next I selected every other edge around the sphere and then clicked ring to select all the edges in that ring. I then clicked collapse to remove these edges and simplify the structure of the head.
I started to create more edges by holding shift and dragging the existing edges and then moving the vertices to the topology guides that I had drawn.

The image above shows how far I have got with this stage of modelling my head. I will continue to work on this section and then join it to the front of the head.
 |
| New reference plate |

I deleted polygons from the sphere to start to shape head. I deleted the inner polgons on the side of the head as well as the ones covering the face and half of sphere as a symmetry modifier will be applied later.

I turned on snap to vertex and moved the vertices at the front of the head so that they lined up with the ones for the face with the use of soft selection.
Next I selected every other edge around the sphere and then clicked ring to select all the edges in that ring. I then clicked collapse to remove these edges and simplify the structure of the head.
I started to create more edges by holding shift and dragging the existing edges and then moving the vertices to the topology guides that I had drawn.

The image above shows how far I have got with this stage of modelling my head. I will continue to work on this section and then join it to the front of the head.
Refining the mesh and creating nose
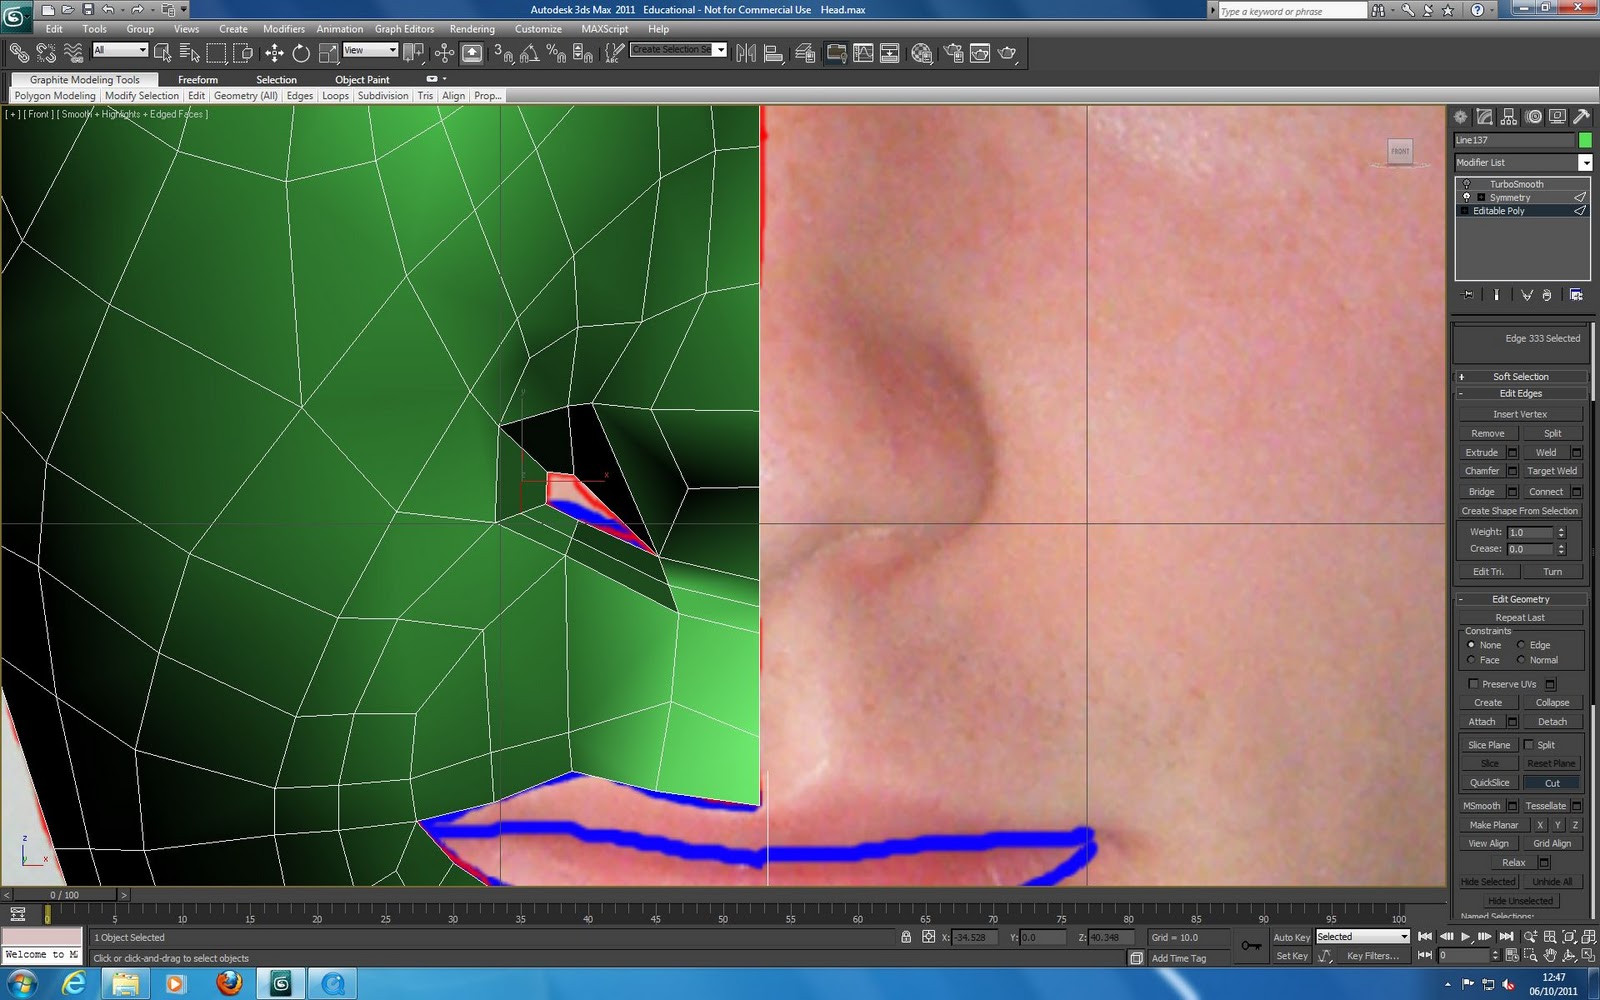
The next step was to refine the mesh and create the nose and lips. I created the nose by extruding the edges by shift dragging then and then moved them into place. The nose needed more vertices as it is quite detailed so I created another row of edges using the connect tool.

Next I adjusted the topology of the nose so that it flowed smoothly around the shape of the nose.

Next I selected the edges around the nostril and then using the extrude tool extruded the nostrils up inside the nose. I used the move tool to move them in place.

Above is the refined mesh with the nose created, next it is time to create the lips.

I created the lips in a similar way to creating the nose and added more edges using the cut tool. I had some trouble getting the lips correct and at the same time making sure the topology is flowing correctly.

Above is the final face mesh, I still may do some more to refine the mesh later in the process. This stage took some time as I spent the time refining the mesh to get it to look good. The next step is to create the back of the head and to create the ears.
I think that so far the model is going well and is progressing at a good rate but there are still a lot of stages to complete to finish the model.
Tuesday, 4 October 2011
Symmetry and Turbosmooth
I added a symmetry modifier to create the other side of the face. I checked the flip box to change the mirroring and then used the gizmo to middle of the face.

Next I added a turbosmooth modifier to smooth the mesh and add more vertices to work with.

Next I will refine the topology and create the nose. This part was quite straight forward as I had used both of these modifiers in a previous module.

Next I added a turbosmooth modifier to smooth the mesh and add more vertices to work with.

Next I will refine the topology and create the nose. This part was quite straight forward as I had used both of these modifiers in a previous module.
Lining up with the guides
Using the reference plate for the side of the face I started to line up the vertices in side view.
I started by moving the middle vertices into place and then continued moving the next vertices along and so on.

It got very confusing when moving the vertices especially the vertices around the eye as they had to overlap.

When moving the vertices by the nose I thought that I would need some more vertices to create the bridge of nose.

I added another edge for the bridge of the nose and then used cut tool to add in another loop around the eye to make sure that there were no triangles created.

I joined this new loop into the existing loop under the eye and adjusted the topology to make sure that only quads were created.
This is the final mesh at this stage, next I will add a symmetry and a turbo smooth modifier.

This step was the most difficult part so far of creating the head model. It started off being quite difficult but then as more of the vertices were in the right place it was easier to place the remaining vertices.
I found that the two reference images didn't line up exactly but this wasn't that much of a problem as having already placed the vertices in the correct place in front view meant that I only had to move them along one axis.

I started by moving the middle vertices into place and then continued moving the next vertices along and so on.

It got very confusing when moving the vertices especially the vertices around the eye as they had to overlap.

When moving the vertices by the nose I thought that I would need some more vertices to create the bridge of nose.


This is the final mesh at this stage, next I will add a symmetry and a turbo smooth modifier.

This step was the most difficult part so far of creating the head model. It started off being quite difficult but then as more of the vertices were in the right place it was easier to place the remaining vertices.
I found that the two reference images didn't line up exactly but this wasn't that much of a problem as having already placed the vertices in the correct place in front view meant that I only had to move them along one axis.
Spline modelling
With the reference plates loaded in and the viewport set to the front view I traced the topology using a splines. Using splines make it easier to just draw the points on top of the guides. I set up the spline so that it would only create straight corners and not curves.

I turned on snap and set this to vertex. This made it easier to trace the topology and made sure that the vertices were lined up exactly.

When trying to trace over some of the smaller parts of the topology the mouse snapped to the wrong vertex. I solved this by going to the snap settings adjusting the snap radius.

I traced all of the topology and then selected one of the spline shapes and converted it to an editable poly.

I then used the attach button to attach all of the other spline sections together into one editable poly. Even though all the splines now belonged to the same editable poly the vertices were not joined. I used weld to join the overlapping vertexes together creating one mesh.

Next I lined up the vertices down the middle of the face by selecting them and then selecting make planar on the x axis. This will make sure that these vertices are straight for when using a symmetry modifier later.
Following the guide for the topology that I had created in the previous step made sure the topology was correct. This part was quite easy as the topology had already been planned out so it was just a case of tracing the guides.

I turned on snap and set this to vertex. This made it easier to trace the topology and made sure that the vertices were lined up exactly.
When trying to trace over some of the smaller parts of the topology the mouse snapped to the wrong vertex. I solved this by going to the snap settings adjusting the snap radius.
I traced all of the topology and then selected one of the spline shapes and converted it to an editable poly.

I then used the attach button to attach all of the other spline sections together into one editable poly. Even though all the splines now belonged to the same editable poly the vertices were not joined. I used weld to join the overlapping vertexes together creating one mesh.

Next I lined up the vertices down the middle of the face by selecting them and then selecting make planar on the x axis. This will make sure that these vertices are straight for when using a symmetry modifier later.
Following the guide for the topology that I had created in the previous step made sure the topology was correct. This part was quite easy as the topology had already been planned out so it was just a case of tracing the guides.
Saturday, 1 October 2011
Finchingfield Guildhall Visit
First there was a talk in the village hall about the history of the Guildhall and the renovation plans by members of the Finchingfield Guildhall trust.
Next we had a chance to look around village and take photos while the other half of the group had a look around the Guildhall.
After this it was our chance to be guided around the Guildhall. We were shown around the different rooms of the Guildhall and the use of the room throughout history, what the room will be used for and how it will look when the Guildhall is renovated was discussed.
The rooms in the guildhall were dusty and parts of the wall were taken down as the building surveyors had been into the building and the renovation work was going to be taking place shortly.
The builders had found an original path about a foot below the cobbled path when digging down to the foundations. This has been looked at by archaeologists and will be on display after the renovations are complete. When looking at the walls old doorways were found. These will be left in place on the inside to show what the old doors would have looked like.
The renovated Guildhall will have a library and museum on the bottom floor and on the top floor there will be a large room that can be used for exhibitions, meetings, functions, conferences and classes.
The visit to Finchingfield and look around the Guildhall was interesting and allowed a lot of information about the Guildhall to be found out. This will help in creating the animation as we will have a better idea about what the Guildhall looks like and what it was used for.
Subscribe to:
Posts (Atom)