Tuesday, 8 November 2011

Guildhall windows

To create the windows I used a plane for the pane of glass and boxes for the frames. From the reference images taken of the guildhall I could see that on the top floor the windows were made up of rectangle pieces of glass but on the ground floor they were diamond shaped with diagonal frames.


I adjusted the window that I had modeled to create each of the windows in the guildhall, adjusting the size and amount of frames in each window.

Windows in place on first floor
To create the windows for the ground floor I used the method but rotated the frames so that they were diagonal.


The windows for the ground floor were trickier as it was harder to move the vertices, to adjust the size, and keep the angle of the frame correct.

Windows in place on both floors

Texturing the model

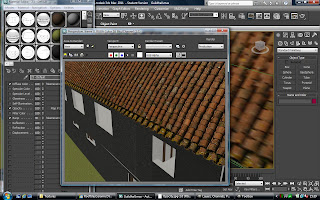
The texture from cgtextures was applied to the roof and was as used as a bump map to create a more textured look. At the bottom of the texture there is a grey section were the tiles end.

I decided to create a opacity map to create the shape of the tiles at the edge of the roof. I used the magic wand tool to select this section and then added a new white layer above the current layer to be the base for the opacity map.


I filled the selection from the magic wand with black. In 3DS Max where the opacity map is white the object will be displayed as normal but where it is black it will display as transparent.


Next I painted the black sections with the paint brush tool to fill in some gaps that were not included in the selection.


Finally I applied a Gaussian blur to make the lines between the black and white sections not so sharp.


I applied the opacity map to the material in 3DS Max and now the edge of the roof looks more realistic.


To texture the chimney I used a brick texture from the internet. To map the texture I added a UVW map modifier to position the texture. I found that cylindrical mapping worked the best then the texture flowed around the chimney if box or planar were used they were stretched along the edges. I selected cap ends so that the brick texture was applied to the ends.

Attic beams

To create the beams for the attic I used the beams created for the previous floors.


I created another beam and rotated it so that it was lying diagonally across the two beams that had already been placed. I then used the array tool to create the rest of the beams.


Next I applied a symmetry modifier and adjusted the symmetry gizmo to adjust the mirroring of the beams.


I added some smaller beams joining the two beams that were placed at the beginning and added another beam on either side along the length of the attic.


I adjusted the position of some of the beams so that they fitted inside the roof of the guildhall.

Sunday, 6 November 2011

Finishing off the Guildhall

As I said in the previous post I found that the windows were on the model were in the wrong place according to the reference image. Some of the windows looked like they were in the right place but others did not.

I stared to move these so that they were in place with the reference plane but this caused problems as then the beams were in the wrong place. So I decided to keep the windows as they were in the floor plans and just position the windows height from this reference image.


I created the beams for attic and first floor and created the arched beam that is positioned above the passageway through the guildhall.


I moved the beams inside the building so that they did not stick through the floors into the other rooms and so they were in the correct place.

I removed some loops from the guildhall that were no longer needed to tidy up the model.


Above the guildhall is shown before starting to add textures to the model. I looked at photos taken of the guildhall to get textures for the model. In these images, taken during the visit, there was a net covering the roof of the guildhall (to stop tiles from falling before off during the renovation?). In other images on the guildhall website this is not there and the tiles looked much nicer, but these images were too small to be used to create a texture.

I used a texture from cgtextures.com for the roof of the guildhall and this worked quite well. I looked for a texture that looked similar to the tiles used on the guildhall.


Next I will continue to add textures for the rest of the parts of the model, then it will be ready to place the items inside and start creating the animation.

Saturday, 5 November 2011

Finishing the guildhall

Continuing the modelling of the guildhall I took the reference images for the side of the building and lined them up. I adjusted the bottom of the floors and the ground as they are not straight as they were in the model.


I fixed the roof to make it the correct shape and modelled the chimney using the new reference images that I had lined up.


I used a box to start modelling the chimney and then used swift loops to add extra loops and create the shape. I selected the top polygon and used inset and then extrude to create the inside of the chimney.


From the attic floor plan I extruded the walls for the attic and then positioned them so that they fitted under the roof.


I added the beams in between the top and bottom floors. To create the beams I used a box and then adjusted its shape after converting it to an editable poly. I then cloned the object and positioned them in place before attached them together.


I modelled the supports between the lower and upper floor and positioned them in place.

Support
Supports in place
After lining up the plans for the front of the building with floor plans I found that the windows don’t line up in quite the right place although the edge of the building is in the correct place.

Having lining up images in 3DS Max, I thought that I should have lined them up in Photoshop really. I brought the images into Photoshop and as far as I can see the windows for the floor plan and windows on the outside plan don’t line up. I kept the windows in place with the floor plan and used the front reference plate to adjust the height of the windows.

Modelling from the floor plan worked well as now the inside and outside of the guildhall has been modelled at the same time. Also the floor plan can be used to place other objects in the scene as these are drawn on the floor plan.

Above is the guildhall model so far. I applied some simple materials to see how the model was looking. These will be replaced with better ones later once the model is finished.

Next I need to create the beams for the ceiling on the second floor as well as the arch over the pathway through the guildhall and add materials and textures to model.

Friday, 28 October 2011

Continue modelling the guildhall

After having modelled the basic shape of the guildhall we got hold of some more detailed plans. I brought these into 3DS Max and adjusted the model slightly where the new reference images were different to what I had modelled.


The two floors of the model now fitted better together. There were lines drawn on the ground floor plan that could be used to help line up the top and bottom floor.


As the new guildhall plans were larger and included more detail it was easier to use them for modelling over the previous ones. It will also make it easier when creating the interior objects as the items inside will be clearer.


I modelled beams for the building using the reference images for both floors. I also used the reference images to model the interior of the attic, I will use this when modelling the roof.


This is what the model looks like so far. Next I need to redo the roof, as it is different in these reference images than the previous reference images I had used, as well as the beams below the first floor.

Thursday, 27 October 2011

Modelling the guildhall

To model the guildhall I set up reference plates using the floor plans that had been collected and traced the outline of these using spline lines. I did this for the top and bottom floor.


Next I added an extrude modifier to see how they would look once extruded and then set up the reference plates for the side of the guildhall.


I scaled the planes and positioned them so that they matched the size of the floor plan. I used a box to make sure that the building was the right size.


I adjusted the extrude value in the extrude modifier until it was correct with the reference plates of the side of the guildhall and then moved the upper floor into place on top of the ground floor.

Next I converted the spline to an editable poly and filled in the gaps that I had left for doors and windows using the snap to vertex tool and create in polygon mode. The extrude modifier was removed as it cannot be used on an editable poly.


I made sure each of the sections was a quad and then used the extrude tool to extrude the polygons for the floor plan up to the height of the bottom of the first window. I extruded this up to the top of the window and then to the top of the ground floor.


Next using the side guides I deleted the polygons where windows and door would be. As I had extruded up to the bottom of the window there was a polygon placed correctly to remove the window.


I then used snap to vertex and create polygons to fill in around the doors and windows.


I did the same for the top floor. Shown are the windows for the church side of the guildhall.


Next I used the road side guide to create the windows for the front this time if there was not a edge loop below the window I used swift loops to add another loop where needed.


This allowed me to delete the polygons in the same way to create the windows.


Above the windows for the front of the building are also shown.

To create the roof I used a box and scaled it to size using the reference guides. I converted the shape to an editable poly and joined the vertices at the top to create the roof. I then moved vertices to create the shape of the roof.


So far modelling the guildhall has gone well. What needs to be done now:
  • In different reference images the roof shape is different and this is also different from the way the roof looks now. We need to find out what one is the correct roof shape before it can be modeled in more detail.
  • The two floors fit together quite well although parts of the top floor are slightly out of line with the ground floor. Using snap to vertex it will be quite easy for these to be lined up.
  • On the north side the diagonal wall on the top floor looks like it is in the wrong place as it doesn't line up as expected with the wall of the ground floor. This may be a problem with the floorplan, the modelling or because it is an old building and the parts look wrong but that may be how it is supposed to be. The wall on the top floor could probably be adjusted so that the two floors fit together nicely.
  • As the guildhall is situated on a hill the bottom of the guildhall model will have to be extended on the road side as I have not yet included this in the model.


Above the basic shape of the guildhall model is shown. This is how the model looks at the moment more work will need to be done to add more detail.