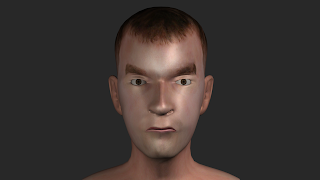
Ground floor
First floor
Attic
Friday, 9 December 2011
Thursday, 8 December 2011
Evaluation
I think that as a group we worked well and we are pleased with the result.
I think that the idea turned out well as it was a bit more interesting than just a standard walk-through. The walk-through section that we created for the second part of the animation was also a bit different as it has the character walking through the scene with the camera rather than just having the camera moving through the building on its own.
I think that the cuts between the separate cameras on the walk through section of the animation turned out well as it seemed to work well changing the camera when the character walked through the doors.
The items that were modeled for the interior of the building look good in the scene and as they are growing in the model.
The animation in the project turned out well. Lots of animation techniques were used in the animation and this allowed new skills to be learnt. Some of the animation sections could have been a little slower as they seem to finish a little to fast, especially the section where the camera zooms out for the final section of the model on the table.
The rendering took a long time and with hindsight maybe we should have started animating earlier so that we had longer to render the animation and fix any issues that arose.
The final animation turned out well and the music that we used in the final video worked well with the animation. There were are couple of problems with continuity in the animation but these are not that noticeable as you concentrate on the main part of the animation.
There are a couple of problems in the animation, the books on the table section are slightly raised above the surface, when the building grows there are slight errors on the models where the faces overlap as it is animating and there are some problems with the guildhall model in some places, this is especially noticeable near the stairs. As the building was modeled in two halves (the top half and the bottom) this areas was overlooked and so it is not consistent between the two floors. Texturing on some of the beams in the guildhall could also be improved.
Time management could have been a little better as it was quite a rush to get the animation rendered and finished on time.
Improvements that could be made to the animation are some of the problems could be fixed and some of the animation sections could be improved.
I think that in creating the animation we achieved a lot in the time that we had and the results have turned out good.
Tuesday, 6 December 2011
Finishing the project
The video files were brought into Premiere Pro to join all the separate scenes together and to add the soundtrack.
The uncompressed footage took up a lot of space and made it difficult to work with the files. After putting the video together we thought that the first 1 minute section worked well just by itself so we tried a version with only this section as well as creating one with the final animation.
Both of the versions of the animation will be handed in but we are still deciding what one to use for the presentation.
Rendering the animation
We started to render the animation to see what it looked like and what we still had to do while we were still working on the last part of the animation.
Before rendering at the final high quality resolution we first rendered a low quality test animation to check what it looked like.
For the building growing scene we adjusted the length of time that it took for the next blueprint to slide into shot and made sure that none of the objects from the ground floor were sticking through the blueprint. We also increased the length of time that it took for the ground to move into shot as this was a little too fast, and fixed some other small problems.
We adjusted the lighting so that the scene was brighter but then had to adjust the other scenes for continuity.
When the scenes were ready we rendered them as an uncompressed avi at 720p. When we rendered the first section we did not select uncompressed and the file was shrunk to the wrong size.
Selecting the uncompressed option created larger files but they were greater quality. They will be compressed when brought into Premier Pro and exported.
The rendering took a long time so it was important that we were happy with the animation before we started the rendering.
Another problem with lighting occurred when unit less not ticked when standard lights were used with the daylight system and the scene was darker and the colours did not match up. We had to re render this section once we found the cause for the problem.
Working in different scene files made the animation more manageable but also made it difficult to ensure continuity between the scenes.
Finishing the animation
Once the animation was finished some problems were spotted so they were fixed and re rendered.
The section where the camera zooms out from the guildhall model was redone as the lights were not the same in the file that was being used. We thought that it would be easier to reanimate this section than to try to fix the lighting in the other file.
The part where with the blueprints didn't line up correctly between scenes as they had accidentally been moved in the different files. The blueprint were lined back up and the a short section was re rendered.
Multiple scenes had to be re rendered due to problems of 3ds max crashing when rendering and the loss of files.
Guildhall walkthrough
The biped that had been created and used earlier in the animation was used during the walkthrough section of the animation. Footsteps were used to move the character through the guildhall and the camera was animated to follow the character.
The biped walks through the rooms in the guildhall to show what the renovated guildhall will look like.
Finally the camera takes a look around the outside of the guildhall to show the complete outside of the building.
The biped walks through the rooms in the guildhall to show what the renovated guildhall will look like.
Finally the camera takes a look around the outside of the guildhall to show the complete outside of the building.
Monday, 5 December 2011
Hair
Hair was added to the model using the hair and fur modifier. After applying the modifier the whole head is covered in hair. In polygon selection mode within the hair modifer the polygons for where I wanted the hair were selected.
Clicking update selection updates the hair to this selection.
Rendering the hair now shows that it needs to be styled and the colour changed.
Using the tools for the hair modifier the hair can be cutand styled. Selecting the style hair button allows the tools to be used. I used the cut tool to make the hair shorter.
Next I used the hair brush tool to style the hair. This proved quite difficult as it was hard to get the hair to flow correctly.
Rendering now resulted in the image below. But the hair is too light even when using a dark colour and not thick enough towards the front.
After animating the head I decided to try the hair and fur modifier again.
I tried to apply the hair with the turbosmooth turned of but this didn't work as when it was turned back on the hair was place in the wrong place.
The hair again was too light gain but this time I found what the problem was. I as the mental ray rendering engine was being used I needed to change the hair rendering options to MR Prim. This converts the hair into geometry during render time.
This can be changed by going to Environment > Effects > Hair&Fur > Hair rendering options > and then changing hair to MR Prim.
This took longer to render but the results were looking better but the hair was still the wrong color.
The hair was displaying the wrong colour as when using MR Prim the material shader needs to be set under mr paramertes. Click apply mr shader and then drag a material from the material browser to the slot and select instance. This allows changes to the material to be made in the material editor.
There are no mental ray hair shaders in 3ds max so I just used a standard material with with a gradient ramp in the diffuse material slot. I set the ramp between two colours so that the hair had a gradient applied to it so that all the hair didn't look the same colour.
Once this shader is used all of the colour settings are controlled in this material and no longer in the hair modifier.
A mental ray hair shader could be used as this would help to create a better hair effect.
I left the count at 15000 and set the cut length of the hair to 12 to make it shorter. I selected style hair and then clicked recomb hair to comb the hair in line with the surface of the head. As the hair was quite short this worked quite well so the hair did not need much combing.
I then increased the count under the multi strand parameters to create child hairs that would increase the amount of hairs and increase the thickness of the hair.
Multi strand renders a clump of hairs around the original hair. I increased the count to 5, root splay to 0.1, tip splay to 0.2 and the randomise value to 0.2. The splay settings determine how much the hair scatters. The randomise determines how random the hairs are in the clump.
I now think that the hair looks too dark but this could be changed easily by adjusting the material. I think that the second time doing the hair it has turned out better but I don't think that hair style is not as good the first time I created it.
More time could be spent on the sytling of the hair and the material that is applied to it.
Clicking update selection updates the hair to this selection.
Rendering the hair now shows that it needs to be styled and the colour changed.
Using the tools for the hair modifier the hair can be cutand styled. Selecting the style hair button allows the tools to be used. I used the cut tool to make the hair shorter.
Next I used the hair brush tool to style the hair. This proved quite difficult as it was hard to get the hair to flow correctly.
Rendering now resulted in the image below. But the hair is too light even when using a dark colour and not thick enough towards the front.
 |
| First attempt |
I tried to apply the hair with the turbosmooth turned of but this didn't work as when it was turned back on the hair was place in the wrong place.
The hair again was too light gain but this time I found what the problem was. I as the mental ray rendering engine was being used I needed to change the hair rendering options to MR Prim. This converts the hair into geometry during render time.
 |
| Hair too light and thin |
This took longer to render but the results were looking better but the hair was still the wrong color.
 |
| Hair with MR Prim |
There are no mental ray hair shaders in 3ds max so I just used a standard material with with a gradient ramp in the diffuse material slot. I set the ramp between two colours so that the hair had a gradient applied to it so that all the hair didn't look the same colour.
Once this shader is used all of the colour settings are controlled in this material and no longer in the hair modifier.
A mental ray hair shader could be used as this would help to create a better hair effect.
I left the count at 15000 and set the cut length of the hair to 12 to make it shorter. I selected style hair and then clicked recomb hair to comb the hair in line with the surface of the head. As the hair was quite short this worked quite well so the hair did not need much combing.
I then increased the count under the multi strand parameters to create child hairs that would increase the amount of hairs and increase the thickness of the hair.
Multi strand renders a clump of hairs around the original hair. I increased the count to 5, root splay to 0.1, tip splay to 0.2 and the randomise value to 0.2. The splay settings determine how much the hair scatters. The randomise determines how random the hairs are in the clump.
 |
| New version |
More time could be spent on the sytling of the hair and the material that is applied to it.
Sunday, 4 December 2011
Face animation
I have used the morpher to animate my head. I created a short sequence showing various facial expressions. These are a smile, surprise, a frown, a wink and blinking.
Using autokey the settings for each of the morph target could be animated.Using the dope sheet gave more control than just the timeline as it made it easier to see which keys were set for each morph.
Smile
I closed the eyes a little bit to that they were not so wide and moved the slide for the smile morph so that it was 100%.
Surprise
I closed slightly more before this expression to create more anticipation for the movement. I then opened the eyes fully along with the mouth and raised the left and right eye brow. I moved the top lip up slightly to improve the shape of the mouth.
Frown
I kept the eyes a little bit closed and moved the slider for the frown morph to 100%. I also used the brows down morph as well.
Wink
I set the smile slider to 100% and eye closed one of the eyes briefly.
Blink
For the blink I closed both the eyes close at same time for a short amount of frame.
Curve editor
Once the keys were set for the animation I used the curve editor to adjust the tangents to speed or slow the animation.
For the blink I set both the ascending and descending part of the curve to a fast tangent so that the eyes opened and closed very quickly.
For the surprise expression I set the curve for opening the mouth, brows up and eyes open to a fast tangent and left the end of the curve how it was. The curve for the wink was set to a slow tangent so that this animation happened more slowly.
More morph targets could be created to allow more expressions to be made by the face. I didn’t use any head movements in the animation but these could be added to make the expressions look more realistic.
Having animated this section I have seen that some of the morph targets that I have created could be made to be moved more as the 100% full movement is still very slight when applied to the head.
The rendered animation is 14 seconds and can be seen above. The video is low quality when uploaded to blogger but allows the animation to be seen.
Using autokey the settings for each of the morph target could be animated.Using the dope sheet gave more control than just the timeline as it made it easier to see which keys were set for each morph.
 | |
| Dope sheet |
 |
| All keys in place |
Smile
I closed the eyes a little bit to that they were not so wide and moved the slide for the smile morph so that it was 100%.
Surprise
I closed slightly more before this expression to create more anticipation for the movement. I then opened the eyes fully along with the mouth and raised the left and right eye brow. I moved the top lip up slightly to improve the shape of the mouth.
Frown
I kept the eyes a little bit closed and moved the slider for the frown morph to 100%. I also used the brows down morph as well.
Wink
I set the smile slider to 100% and eye closed one of the eyes briefly.
Blink
For the blink I closed both the eyes close at same time for a short amount of frame.
Curve editor
Once the keys were set for the animation I used the curve editor to adjust the tangents to speed or slow the animation.
 |
| Curve editor |
 |
| Blink curve |
 |
| Mouth open curve |
Having animated this section I have seen that some of the morph targets that I have created could be made to be moved more as the 100% full movement is still very slight when applied to the head.
The rendered animation is 14 seconds and can be seen above. The video is low quality when uploaded to blogger but allows the animation to be seen.
Thursday, 1 December 2011
Guildhall renders
Sunday, 27 November 2011
Guildhall animation - scene 2
Using the slice modifier applied to the separate objects in the scene the guildhall could be animated growing.
We selected the objects, and with the slice modifier setting to remove top, moved the slice plane below the object so that none of the object was visible. By turning on autokey, moving to a later frame and then moving the slice plane so that the it was above the object the building appeared to grow.
We did this for the groundfloor with the walls and finally the objects inside the building. We animated different parts of the building growing in order the sliced in order and then adjusted the timing so that the different objects growing were a bit more random making it look more organic.
The blueprint slides in on top of the model at this point and then the next part of the building will grow.
We repeated the same process for the for the first floor and then finally the attic.
We rendered a test video and found that this turned out quite well although there were some problems that needed to be fixed.
We decided that we wanted the camera to be closer to be building as it is growing so that it will be easier to see the objects inside. We will also change the speed as it seems to be moving a little to fast.
Guildhall animation - scene 1
I added the radiators (Jack), fridge magnets (Steve) to the scene and then merged the character created by Hong into the scene. The character was too small so I selected everything in the scene and scaled it so that it was in proportion with the man.
This scene was now ready for the animation, Hong animated the first section where the character turns on the radio. After this we created another file to create the growing building animation. We decided to split the separate parts of the animation into different files to make the scenes more manageable and to allow separate parts of the animation to be worked on at the same time.
Scene 2 of the animation will be the guildhall growing from out of the blueprints on the table.
This scene was now ready for the animation, Hong animated the first section where the character turns on the radio. After this we created another file to create the growing building animation. We decided to split the separate parts of the animation into different files to make the scenes more manageable and to allow separate parts of the animation to be worked on at the same time.
 |
| Render of the table where the building model will be placed |
Scene 2 of the animation will be the guildhall growing from out of the blueprints on the table.
Morpher
The mopher modifier will be used to animate facial expressions for the head model. The head will be cloned and the vertices moved on them to create different facial expressions on each of the heads, these will then be linked to the morpher modifier so that they can be used to the animate the face.
I started by taking my head model and collapsing the modifier stack so that the symmetry and UVW unwrap modifiers were applied to the model. Applying the UVW unwrap modifier keeps the settings in the mesh and these can be got back by applying a unwrap UVW modifier again.
I turned off the turbosmooth modifier and cloned a series of heads to be used to create the different expressions that will be used with the morpher modifier.
I removed the turbosmooth modifiers from the cloned heads.
On the first head I decided to create the mouth open. I selected the polygons for the mouth and chin and moved it down. When using the morpher modifier you can’t change the amount of polygons, only move then about or it will not work.
On the next head closed the right eye. I selected the polygons for the bottom of the eye lid and then the top and positioned them so that the eye lid was closed.
I did the same on a different model for the other eye.
Now to apply the morpher modifier. I took the original head and added a morpher modifier below the turbosmooth.
I right clicked in one of the empty slots, selected pick from scene and then clicked on the first cloned head with the mouth open.
At the right of this is a box that can changed from 0-100. Changing this amount on will blend the effect of the mouth open model into the original model. This will allow the how much the mouth opens to be controlled.
The left and right eye opening was added in the same way. Now using the morpher modifier both the eye opening and mouth moving can be animated. They can be used at the same time or individually.
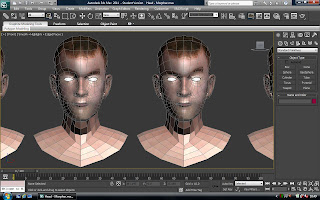
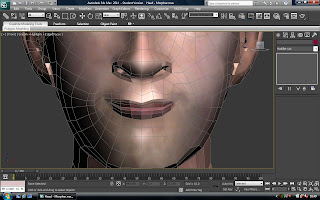
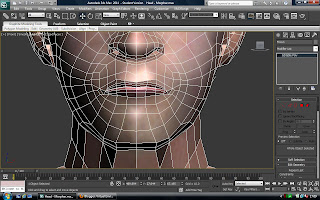
I cloned more heads from the original and adjusted them to create the left and right brows up, smile, frown, top lip up and bottom lip down. I added these to the morpher modifier in the same way.
I decided that the mouth wasn't open enough so it increased this and reapplied it to the morpher.
I cloned another head to create a brows down expression this can be used with the frown morph created earlier.
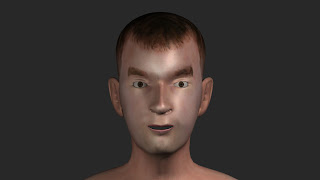
With each of these expressions applied to the model using the morpher modifier they can be used to to adjust the expressions of the face. Renders of the expression are shown below.
The different expression can be combined together using the morpher to create complex expressions. Here the brows down expression and frown are applied together.
Different morphs could be created for the different phonemes and then these could be used create lip sync animation.
I started by taking my head model and collapsing the modifier stack so that the symmetry and UVW unwrap modifiers were applied to the model. Applying the UVW unwrap modifier keeps the settings in the mesh and these can be got back by applying a unwrap UVW modifier again.
I turned off the turbosmooth modifier and cloned a series of heads to be used to create the different expressions that will be used with the morpher modifier.
I removed the turbosmooth modifiers from the cloned heads.
On the first head I decided to create the mouth open. I selected the polygons for the mouth and chin and moved it down. When using the morpher modifier you can’t change the amount of polygons, only move then about or it will not work.
On the next head closed the right eye. I selected the polygons for the bottom of the eye lid and then the top and positioned them so that the eye lid was closed.
I did the same on a different model for the other eye.
Now to apply the morpher modifier. I took the original head and added a morpher modifier below the turbosmooth.
I right clicked in one of the empty slots, selected pick from scene and then clicked on the first cloned head with the mouth open.
At the right of this is a box that can changed from 0-100. Changing this amount on will blend the effect of the mouth open model into the original model. This will allow the how much the mouth opens to be controlled.
The left and right eye opening was added in the same way. Now using the morpher modifier both the eye opening and mouth moving can be animated. They can be used at the same time or individually.
 |
| Brows up |
 |
| Smile |
 |
| Frown |
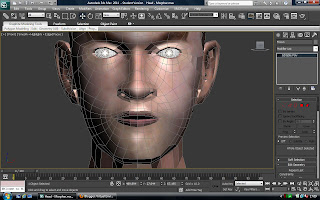 |
| Top lip up |
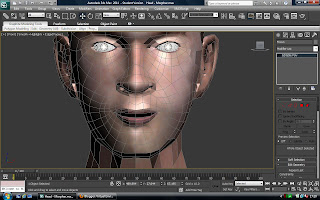 |
| Bottom lip down |
I cloned another head to create a brows down expression this can be used with the frown morph created earlier.
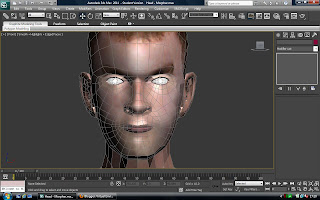 |
| Brows down |
 |
| Normal |
 |
| Smile |
 |
| Eyes closed |
 |
| Frown |
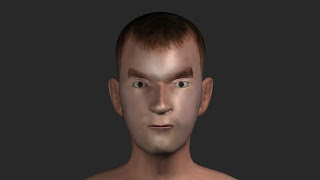 |
| Brows down |
 | |
| Bottom lip down |
 |
| Top lip up |
 |
| Mouth open |
Different morphs could be created for the different phonemes and then these could be used create lip sync animation.
Subscribe to:
Comments (Atom)


